
Want to make awesome visuals for your blog or boost your marketing with eye-catching graphics? Want to make your social media images pop?
Then, if you aren’t already, you need to be using Canva.
Since I’ve had a lot of questions on how I make my graphics and book aesthetics, I thought I’d do a tutorial/product review of the program Canva.

This post contains a referral link meaning I will get a free credit if you sign up with the link I’ve supplied at the end of this article.
What is Canva?
![]()
Canva is a graphic-design tool, perfect for making eye-catching visuals (both for printing or web use) with simple drag-and-drop features.
It’s used by both amateurs and professionals, so even if you have limited tech ability, you can get a lot from using Canva.
It was designed to be easy to use. Once you get a grip with the different features you realise just how simple it is to make impressive graphics in little time.
Templates
Canva is chockfull of templates for you to use if you’re not yet confident in creating your own designs.
Below is a small sample of the templates for making Flyers or Cards.

When you sign up and log in, you can instantly choose from a large array of templates. Here are just some of the categories. (There are lots more).
- Poster
- Logo
- Presentation
- Flyer
- Card
- Resume
- Brochure
- Invitation
- Menu
- Letterhead
- CD/Album cover
- Magazine
- Calendar
- Social Graphic
- Photo Collage
- Gift certificate
- Tag
All my social media graphics are created with Canva. The templates are designed to be the perfect sizes for their respective platforms.
For example, the best pins on Pinterest have long vertical images. This is why my banner images on my blog are tall vertical images like this:


This allows me to use them on Pinterest and if anyone pins my articles, they can select this banner and it works best on Pinterest.
Customise
You can also create your own customised design in the size you want. Simply use this custom dimensions box by adding in your specifications.

You can change the specifications from px (pixels) to centimetres, millimetres or inches.
Design Dashboard
Whether you choose a template design or create your own custom-sized design, you will be taken to this layout.

In the screenshot above, I choose a template so you could see the active design area. If you create your own custom-sized area, the active area will just look white until you add in your designs.
Menu Bar
On the left, you have a menu bar. From the above screenshot, you can see the top option is Templates and you have several template options. Against each of those templates, you can just see the words “see all”.
So if you chose the top option called “Mood Board Photo Collage” the ‘see all’ will give you even more designs under that category.
I’ll do a quick rundown of the other options on the menu bar:
Photos
Canva has a section of photos that can be used. Many of these are not free and have to be purchased, you can see the ones that have a £ sign on them. If they are free, they will say so.
You can use the categories at the top or use the search bar to find an image that works. Canva shows images that are trending.
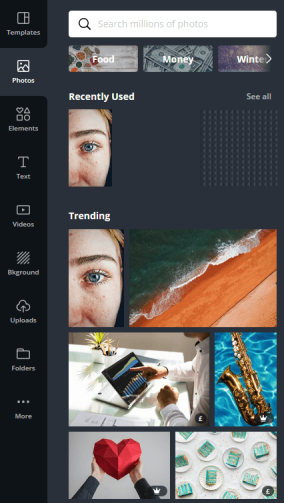
Elements
Elements give you everything from shapes and lines to grids and stickers and more. The grids you see on the below screenshot are designed to allow you to “snap-in” photos and images.
So if you created your own custom design, as I said above, your active image would just be blank white. If you wanted to add photos or images, you would select one of the grid options. These would then allow you to add in photos that snap to those shapes/sizes.

Text
You can add text to your design. Either select the font combinations that give you a heading and subheading texts in different fonts or simply use the “Add a Heading” / “Add a subheading” options.
If you use the latter, you can then change the text later on.

Video
Want to add a video element? Choose from several that Canva has. They are broken down by category and you can see how long each video is at a glance.

Backgrounds
Canva supplies a large collection of background images that can be searched by colour. You can also select any background, drop it into your design and then change the colour tone of it using the formatting tools.

Uploads
If you want something different, Canva lets you upload your own photos and videos allowing you to make your designs more personal or branded. Here’s a collection of some of the photos and images I’ve uploaded for use on my graphics.

Folders, More
There is also Folders and More. The ‘Folders’ option simply has a folder for your purchased images should you buy any and one for images you’ve liked. The ‘More’ option has links to social media.
Formatting Tools
There are numerous formatting tools available to help you create your design how you want it. However, there are not so many that it gets overwhelming.
In the screenshot above, they weren’t showing because I hadn’t selected an element of the template. Because there are different tools for aspects (such as images/text) they only appear when needed.
Images
For example, if I click on a picture in the template I chose, the following Formatting Tools appear above the active area.

The above tools allow you to make changes to an image or background. The colour wheel will give you a palette to choose from or if you know the RGB code for a specific colour, say for your branding, you can put it in.
You can also adjust, crop, flip, amend the spacing or add a filter to your images. When you click on each of these tools, it opens up additional choices that you just need to select.

The above formatting tools also appear at the same time as the other ones. They let you duplicate your images, this is useful if you have specific elements like lines or stickers that you want repeating.
‘Position’ option allows you to align your images to the left, right, centre as well as move them to the front or back, so if you want a picture to become the background you can move it back until the text and any other elements are in front of it.
The paint roller image allows you to copy the style. The checkered image allows you to amend transparency of an image. The chain link icon allows you to link an element to an external website, the padlock locks your design and the bin allows you to trash elements.
Text
Similar to images, if you select any text element on your design you get a different set of formatting tools.

This toolbar offers you the chance to change the font, sizing and colour of your text. If applicable, you can bold, italicise and underline your text.
You can also align your text and the aA symbol allows you to change any text from all caps text to lowercase.
You can add bulleted text and spacing allows you to amend the spacing between both lines of text and individual letters.

The text option also gives you the same formatting as images, though it goes include group/ungroup. If I had selected several images at the same time, this would have appeared allowing me to group or ungroup them also.
Create Your Design
To make my own design but using this template style, I simply clicked on each photo in the template and deleted them.
I then went to my Uploads and dragged three photos from there and dropped them into the picture elements.

To do this, you click and hold with your mouse on the image you want to add, drag it across to the picture element. As you cross over the edge of the picture element, Canva “should” drop your chosen image in.
If it works, you will see the image you have chosen filling the picture element, so you can let go with your mouse. Sometimes it can take a little finessing.
I then changed the text box colour to black, amended the text words, fonts and colour. I also changed the raven picture to black and white by selecting a grayscale filter.
Ten minutes (that included me finding the right pictures in my Uploads folder) and I had this simple character aesthetic for my WIP The Blessed.
Publish
When you’ve completed your design, you can “publish it”. This can be either directly onto a platform (in some cases) or you can download it or send it as a link.
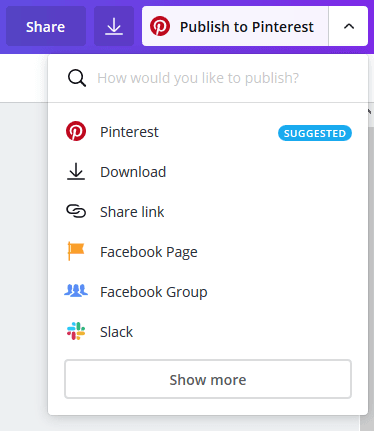
In the top right-hand corner is the publish button. In the screenshot below, it says “Publish to Pinterest.” This was because the design I made when I took this screenshot was of a Pinterest-sized banner.

You can click the “Publish to Pinterest” button or click the ‘more’ arrow on the right. This will give you more options.
Here we see you can download, share as a link or publish to a Facebook Group or Page. If you create a Twitter-sized image, then you will be given the option of Publishing directly to Twitter etc.
If you just want to download the image rather than publish it directly to a platform, you can choose the download button (the down arrow icon) next to Publish button.
This will give you a drop-down menu so you can choose which file type to download it as. I always download as PNG because I prefer the higher quality, but JPG is good if you have limited space capacity or want faster loading.

A progress image might appear letting you know your image is being downloaded, then you can find it in your downloads or if you have it set up, it may open automatically for you so you can then save your image where you wish on your computer.
I personally prefer to download and save my graphics so I can upload them into the social media scheduler, Buffer. So I’ve never used the “Publish to Twitter/Pinterest” options.
Saving Your Work
As you create your designs, they are being automatically saved. Along the top, you will see it say either “All changes saved”, “unsaved” or “saving…”
Always make sure your changes are fully saved especially before you publish. In very rare occasions, an error will occur and your changes won’t save.
Usually, you will get a message pretty fast, as it saves constantly, you are warned before you’ve made too many changes. You can then reload your redesign and make the changes again.
Double-check it says “All changes saved” before publishing otherwise you can end up downloading an incomplete design.
Your Designs
All the designs you create will be saved on the main page under Your Designs. You can use them again and overwrite them, which I do for some things.
Others I like to copy and amend the copy so that I have the branding/layout but keep each design separately.
Or you can create a new design each time. Here are a few of my saved templates. Each of these ones will change as I overwrite them.
I just have them for the layout and branding but I don’t need to keep each of these individual designs once I’ve used them.
I don’t know how many designs Canva lets you save, I’ve never had a message telling me it can’t save any more in Your Designs and I have LOADS.
My Thoughts
I’ve been using Canva (Free version) for years and it has been a true game-changer for my blog and helped me build up my brand.
It has changed a little over the years but it has only got better. The number of features and templates are incredible.
There are tons of images to choose from and the option to add in your own just makes things even better.
So if you use picture sites such as Unsplash, where you can download free photos and vectors, you can create some striking graphics specific to your needs.
EDIT: As of 2021, I’ve been using the paid version and am loving all the extra features, larger photo library and branding section.
Pricing
Canva is FREE.
Yes, you heard it right. Canva is FREE to use and for everything they give you and all you can do, it’s incredible.
They do have a paid plan called Canva Pro which gives you so much more and you can upgrade to that at any time. Depending on what you need it for, the paid version may be a better bet.
While it is free to use there are some elements, pictures and templates that are not free. Any template or image that isn’t available in the free plan, has a little crown icon (for Canva Pro) or a currency sign on the thumbnail and a Canva watermark* on the actual image.
You don’t need the paid version to get these, you can just pay individually for any image like that. Which I think is a great option.
*If you scroll up to the template I was using, you will see the Canva watermark on one of the original pictures. If I had wanted to use that photo, I would have had to pay to get rid of the watermark. Instead, I just used the template style and deleted the photos I uploaded.
Wanna Try Canva & Get Rewards?
If you are not yet on Canva and want to give it a try, I’d love it if you would use my referral link.
If you use the below link to join Canva and then create a design, both of us earn 1 Canva Credit. Canva Credits can be collected and used for premium images.
CLICK HERE TO TRY CANVA TODAY
~ ☆ ~ ☆ ~ ☆ ~
Big thanks if you made it all the way through this long tutorial. I really hope you found it useful especially if you never yet used Canva.
Happy writing
Twitter ☆ Facebook ☆ Instagram ☆ Linktree

Pingback: Creating A Desktop Wallpaper – Author Ari Meghlen Official Website
Pingback: How I Handle My Instagram Account – Author Ari Meghlen Official Website
Pingback: Top 10 Digital Tools I Use Daily – Author Ari Meghlen Official Website
Pingback: How To Create Awesome Pictures For Your Blog – Official Author Website of Ari Meghlen
Ari, this is a brillaint guide! You do these so well! I’ve been using Canva for a while with trial and error and love I it – but you have gone into so much detail I can see where I can take it further. Will be sharing this! :>)
Hi Lynne, thank you so much, I am really pleased you found this article helpful. I love Canva, it’s such a great program and everything you can do in the free package is incredible!
This is really helpful. I’ve been using Canva a little bit and experimenting with things. One thing I’m trying to do is
turn my books into a boxed set image, or arrange them on an angle so that they’ll look 3 dimensional. Do you know if this is possible with Canva?
Hi Debra, firstly, I am so sorry for the delay in replying, I have gotten behind on all my comments. As for your question, you may need to find a “mock-up” template of 3D books in order to add your graphic to them. I’m not sure you can angle them and create the look you want. But you might find a template with a blank book image you can drop your book cover into.
Otherwise, you can use PlaceIt.net which loads of templates for doing this, but I think you need a paid account – though, with the different types of marketing imagery you can create can well be worth it.
Thanks, Ari. No worries about the delay. Life is busy!! Stay healthy and safe!
Thanks Debra. You too. Blessings.
Great post and thank you for the tutorial 🙂 I definitely need to try Canva. Good to hear there’s a free option as I’m always wary of paying for any service until I can try it for free first. 🙂
Hi Cat (sorry for the delay in replying!) I really hope you enjoy using Canva. I am still using the free version of Canva and I do EVERYTHING with it. While the paid option looks good, I don’t need it yet and you can do so much. Any problems/queries with using it, let me know 🙂
Thanks. No worries on the delay, though I am wondering if you ever got my emails that I sent you? I sent them a while ago now I can’t remember what I wrote, lol. But I’m just asking because a bunch of my emails kept failing to send a few weeks back, as if gmail had issues with my account or something so just wondering, if you ever get the chance to look, whether you got the emails?
I love Canva, I use it so often. I agree, it’s been a game changer for me too. Great post.
Thanks Lorraine. Yes! It is awesome and even just the free package is perfect.
I’ve heard SO much about Canva throughout my time as a Blogger.
I believe I have an account there, but I have not used it since the account creation. I found it rather confusing and limiting. I had no idea you can swap pictures in and out. That might be a game-changer.
Thank you so much for this tutorial. It was very detailed and comprehensive at the same time. Well done.
Hi Sam, thank for your comment. I’m really glad you found this useful and I hope it helps you start trying Canva again. Once you have templates created, it becomes so much easier. I have templates for all my Social Media accounts and the Title banner for my blog so it’s just a case of shifting out pictures and changing text. All the colours, fonts and sizes remain the same. I LOVE it!
That definitely makes sense.
Hmmm… I shall think about that.
I have had a look at Canva, but I need to take the time to get used to it and master it. Thanks for this fantastic post.
Thanks so much for your comment, apologies for the delay in replying. I am so glad you found this useful. It can take a little time but hopefully if you refer to this tutorial, you’ll get used to the different features pretty quick and if you are ever struggling with anything, feel free to drop me a message and I’ll try and help 🙂
I use Canva too and love it!
I know right! It is seriously awesome!!
Ari, as always your tutorial posts are so informative. You always manage to post a topic when exactly when I need help. I am trying to redesign my brand, banners etc. I try Canva and had somewhat difficult time. Thank you for explaining in such detail how to use it. Hope you are well and your New Year is fantastic. Your friend, Sue Urasky
Hi Susan, so glad I could help. If you have any questions regarding canva feel free to ask and I’ll do what I can to assist.